Halloween Science Tricks
Spooky Halloween Tricks for Mad Scientists
 Spooky Glowing Jack-o-lanterns
All your neighbors will have Jack-O-Lanterns that glow orange, but you will impress them with a Jack-O-Lantern that glows green, blue or purple! Best of all, this glow is simple and safer than traditional candles.
Purchase one or two large glowing light-sticks per pumpkin at a party store or hardware store. Activate the light stick and simply drop them into the pumpkin, or, to conceal the glow sticks, attach them to the inside of the pumpkin lid by unbending large paperclips to secure them. Place your pumpkin outside on Halloween night and admire the Ooos and Aaahs of Trick-Or-Treaters!
Smoking Mad Scientist Flasks
This is a simple trick using dry ice, which you can pre-order at your local grocery store or Walmart for Halloween. Add an 2-3 inches of warm water and a few drops of food coloring to a tall science flask or beaker. Use tongs or gloves to place a piece of dry ice into the warm water.
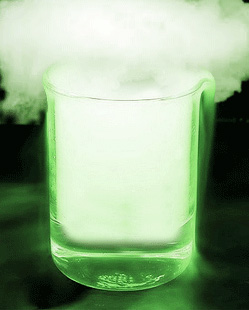 Immediately, the dry ice will begin to turn into carbon dioxide gas and water vapor, forming a really cool cloud. This cloud is perfectly safe to touch and feel as long as no one puts their fingers far enough down into the water to accidentally touch the dry ice.
To create the best effect, be sure to use warm water. Over time, the dry ice will make the water cold and the "smoking" will slow down. Replace the cold water with warm water and you're back in business! Voila! Smoking "chemicals" to scare your friends!
Dry Ice Safety
Warning: Do not touch dry ice with bare skin! Here's the background information on dry ice. Dry ice is frozen carbon dioxide. Instead of melting, dry ice turns directly into carbon dioxide gas but does not melt like real ice. Dry ice must be handled with care -- because it is -110 degrees F! When purchasing dry ice, bring gloves and an insulated container to the store to carry it in. Dry ice must be handled using gloves or tongs, as it will cause severe burns if it comes in contact with your skin. Never put dry ice into your mouth. When making bubbling, smoking water for young children, it's best to use tall narrow graduated cylinders filled with water and dry ice so they cannot fit their hands in to it.
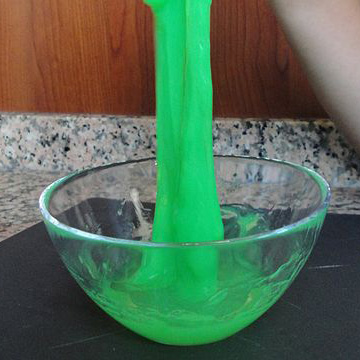
Homemade "Slime" Recipe:
Let's get cooking! To make realistic, creepy slime in your home laboratory, all you need are a few simple ingredients and tools! Here is how to do it:
 Tools and Ingredients
- Elmer's glue (most kinds of white craft glue will work)
- 2 disposable cups
- Food coloring (you pick the color)
- Water
- Borax Powder (available at most large grocery stores near the laundry detergent)
- A plastic spoon (for stirring)
- A tablespoon (for measuring)
Instructions:
- Fill one small cup with water and add a spoonful of the Borax powder and stir it up. Then set it aside.
- Fill the other small cup with about 1 inch (2.5 cm) of the glue.
- Add three tablespoons (20 ml) of water to the glue and stir.
- Add a few drops of the food coloring and stir it up until mixed.
- Now the fun part...Add one tablespoons of the Borax solution you made earlier and stir well. Watch the slime form!
- After the slime forms let it sit for about 30 seconds and then pull it off the spoon and play with it!
 Glowing Halloween Decorations: Glowing Skulls on the sidewalk, door or window
Did you know that Laundry Detergent glows in the dark? Tide, for example, contains brightening agents that glow when exposed to light. If you have laundry detergent, you can make a glow-in-the dark skull image that you can put on your sidewalk or window that will be invisible during the day but will glow at night. Here's how you do it:
Tools and Ingredients
- liquid laundry detergent or else mix powdered detergent with a bit of water
- sponge or paper towel
- either artistic talent or else a stencil
- black light
- Download a skull stencil pattern and print it.
- Cut out the eyes, nose, and mouth of the skull.
- Select the location for your decoration. I chose a part of my front walkway that was near one of my porch lights. I switched out the normal light bulb for a black light. I could have used a black light and an extension cord to put the decoration anywhere. This project works well on a sidewalk or a wall. You could put the skull on a windowpane if you wanted.
- Dampen a sponge or paper towel with liquid laundry detergent. You want it wet enough to deposit the color, but not dripping wet.
- Place the stencil where you want the decoration.
- Blot over the stencil with the detergent-coated sponge to fill in the shapes of the skull. If you mess up badly, just wash it off and try again.
- Turn on the black light when you want to see the decoration. Turn the light off when you don't want to see it. Wash away the picture when Halloween is over. Read more from Chemistry.about.com
 Colored Fire
Here are some reliable ways to make colored fire:
- Toss dry colorants onto the flames.
- Soak logs in an alcohol solution of colorants.
- Prepare pinecones, sawdust, or cork with colorants.
In general, there is no specific proportion of colorant to mix with the alcohol. Add as much powdered colorant as will dissolve in the liquid (roughly a half pound colorant to a gallon of alcohol). Do not attempt to mix colors together because you might end up with a normal yellow flame. If you want multicolored fire, try adding several pinecones, each treated with a single colorant, or scatter a mixture of dried colored sawdust across the fire.
How to Prepare Pinecones or Sawdust
It's easy! Remember to do this procedure separately for each color. You can combine dry pinecones or sawdust with different colorants later.
- Pour water into a bucket. Use sufficient water to be able to wet your pinecones, sawdust, or waste cork. Skip to step 3 if you purchased your colorant in liquid form.
- Stir in colorant until you can't dissolve any more. For sawdust or waste cork, you may also add some liquid glue, which will allow the pieces to stick together and form larger chunks.
- Add the pinecones, sawdust, or cork. Mix to form an even coat.
- Let the material soak in the colorant mixture for several hours or overnight.
- Spread the pieces out to dry. If desired, pinecones may be placed in a paper or mesh bag. You can spread sawdust or cork out on paper, which will also produce colored flames.
How to Prepare Logs
Follow steps 1 and 2 above and either roll a log around in the container (big container, small log) or else pour and spread the mixture onto the logs. Wear kitchen or other protective gloves to protect your hands. Allow the logs to dry. If you make your own newspaper logs, you can smear colorant onto the paper before rolling it.
Points to Keep in Mind
- The element sodium burns with the usual yellow flame. The presence of this element can overwhelm any other color. If you are making a dry mixture of colorants or colored pinecones/sawdust, avoid including any colorant that has sodium in it.
- If you are using alcohol-based colorants: Remember that alcohol is flammable. If you don't allow it to evaporate before use, you will get a lighter-fluid effect. Use with care!
- Don't color BBQ fire! The colorants may produce pretty flames, but they can also produce toxic food.
- Keep colorants away from children and handle them with the care and respect due to potentially hazardous chemicals. Read and adhere to any warnings listed on product labels.
Now, here is the list of colorants. Most can be found in a grocery or dry goods store, in the laundry or cleaner section. Look for copper sulfate in swimming pool supplies (already in water, which is fine). Potassium chloride is used as a salt substitute and may be found in the spice section. Epsom salts, borax, and calcium chloride may be found with laundry/cleaning supplies. Others, including strontium chloride, can be obtained from stores that specialize in rocketry or firework supplies.
Flame Colorants:| Color | Chemical |
| Red | Strontium Chloride or Strontium Nitrate |
| Orange | Calcium Chloride (a bleaching powder) |
| Yellowish Green | Borax |
| Green | Copper Sulfate or Boric Acid |
| Blue | Copper Chloride |
| Purple | Potassium Chloride |
| White | Epsom salts |
These websites are a great source of Halloween inspiration:
- Science Bob's Halloween Science Experiments and Ideas.
- Halloween Science Projects on chemistry.about.com
- Steve Spangler's Science Store
This Halloween, make your science spook-tacular!